- Lets say a daily cron runs which extracts employee attendance from database and exports it in .csv file
- A user will have to manually download this .csv and import it in Sheets, apply headers, set font size etc (DAILY)
This process can easily be automated and requires zero human interaction once the initial setup is done.
See the script in action here!

Here is a sample script that I made. This script create a new worksheet in a pre-defined spreadsheet where the name of the worksheet is current world date. It can be modified to whatever your use case requires.
# Libraries
import gspread
from datetime import date
from oauth2client.service_account import ServiceAccountCredentials

# Authorization
scope = [
    "https://spreadsheets.google.com/feeds",
    "https://www.googleapis.com/auth/spreadsheets",
    "https://www.googleapis.com/auth/drive.file",
    "https://www.googleapis.com/auth/drive",
]
credentials = ServiceAccountCredentials.from_json_keyfile_name("credentials.json", scope)
client = gspread.authorize(credentials)

# Variables definition
today = date.today()
curr_date = today.strftime("%m/%d/%y")
spreadsheet = client.open("MySpreadsheet")
worksheet = spreadsheet.add_worksheet(title=curr_date, rows="1000", cols="5")
curr_sheet = curr_date + '!' + 'A1'

# Import CSV Function
def ImportCsv(csvFile, sheet, cell):
    """
    csvFile - path to csv file to import
    sheet - a gspread.Spreadsheet object
    cell - string giving starting cell, optionally including sheet/tab name
      ex: 'A1', 'Sheet2!A1', etc.
    """
    if "!" in cell:
        (tabName, cell) = cell.split("!")
        wks = sheet.worksheet(tabName)
    else:
        wks = sheet.sheet1
    (firstRow, firstColumn) = gspread.utils.a1_to_rowcol(cell)

    with open(csvFile, "r") as f:
        csvContents = f.read()
    body = {
        "requests": [
            {
                "pasteData": {
                    "coordinate": {
                        "sheetId": wks.id,
                        "rowIndex": firstRow - 1,
                        "columnIndex": firstColumn - 1,
                    },
                    "data": csvContents,
                    "type": "PASTE_NORMAL",
                    "delimiter": ",",
                }
            }
        ]
    }
    return sheet.batch_update(body)


ImportCsv("data.csv", spreadsheet, curr_sheet)You can always fetch the latest code from my GitHub repository -
 ishaanx
Authentication
This section will help you to get the credentials.json file needed for authentication.
- Create a free account on Google Cloud
- Create a new Project
- After your project is created go to Dashboard and search for Google Drive API and Google Sheets API. Enable both of them.
- Go to IAM > Service Accounts > Create a service account. You can name this account anything
- Here for test purposes we will give Editor access to our service account. You can play around and figure out which one suits for your application best
- After the Service Account is created open it and look for 'Keys' section
- Tap on Add Key then select Json as the key type. It will download a .json file which we will need for authentication
- The final step would be to give edit access to our Google Sheet by sharing the sheet with the service account email address. This email address can be found under Service Account details
ishaanx
Every service is 'proxied' via jwilder's nginx proxy module. Link here.
Each service is on it's own sub-domain. This is handled by jwilder's proxy module. All I have to do is add the following environment variable and forwarding rules in my DNS server. For example, I access vscode editor diretly on my server by visiting https://code.home.server
- VIRTUAL_HOST=code.home.server
I distinctly remember which game got me into gaming community. It was Prince of Persia 3D. I have very fond memories of playing that game for hours with my cousin. Then came the Sands of Time sequel and the very dark and legendary sequel to that - Warrior Within. Every year I do a Warrior Within marathon; I play this complete game in two days without sleep!
But instead of a powerful PC I decided to buy a console 2 years back since I never owned one and would like to get a feel of console gaming. Using the console for two year I realize that its still no match for a PC when it comes the variety of games. I understand the differences between console and PC gaming war that is going on for ages.
Last month in mid August, I decided to start building my very first PC. I poured literally 20 days on researching on how a PC is built. There are a lot of factors contributing to this which I did not expect. I watched ton of Youtube channels, read blogs etc. I finalized my budget and built a PC parts list on a simple spreadsheet. I ordered bare minimum parts which are required to get my PC up and running. This way I can add parts later on as needed.
I still think that this PC is overpriced, mainly because all the parts in India sells close to MRP.
Here is how my minimal PC looks like right now.


Current Specs:
- Motherboard - MSI B450 Gaming Pro Carbon Max Wi-Fi
- CPU - AMD Ryzen 2700 8 cores @ 4.1GHz
- RAM - Trident Z RGB 16GB (8GBx2)
- Cabinet - Thermaltake H200 Snow Edition
- Graphics Card - ASUS ROG Strix Radeon RX570 OC Edition 8GB
- Storage - WD 240GB WD SSD M.2
- Cooler: Stock
- PSU - Corsair 650M
Future upgrade plans-
- Dual monitors
- Extra cabinet fans for better air cooling
- More Air filters
- AIO Liquid Cooler
- 1 TB SSD
- Cable management, especially around my desk. A lot of wires actually are from my server, router and RaspberryPi.
This is still not a super high powered gaming rig. It's bare minimum to get games running in medium to high settings with 50+ FPS. Since I already own a console and I don't plan to play AAA titles in this PC, I have kept the specs at minimum. This PC will be my main workstation because my old laptop is almost on its deathbed.
Here is spreadsheet with all the details of my PC -
https://drive.google.com/file/d/1A8IxIusjNZv3GZSJEHXLczPRrvSdoAZA/view?usp=sharing
I watched a lot of these Youtube channels which helped me learn a lot about all the nitty-gritty details of PC building -
- JayzTwoCents
- Linus Tech Tips
- Indian Gamer
- Bitwit
- PC Centric
Let's play some Mario now!
]]>Using Ghost allows me to spend more time on writing and less time on fixing and hacking things which I was previously doing with my Hexo blog. You can find my old blog design here.
Migrating to Ghost was quite simple and DigitalOcean made it even simpler. I am back on DigitalOcean almost after 3 years. DigitalOcean offers one click solution to deploy Ghost blog. Here's how I did it in-case anyone is planning the same solution -
Signup at DigitalOcean
Head over to DigitalOcean's website and create an account.
Create a new Project

Now we create a 'Droplet'. It's DigitalOcean's way of saying an 'instance' if you are coming over from AWS. Search for Ghost in the marketplace.

Choose a plan. I would recommend the $5 plan. It's more than enough for a small to medium size blog. You can always resize the droplet later.

Choosing a datacenter region
Now this one is a difficult choice. Inititally I selected random region because I did not know if it would make any difference. I live in India and I selected the datacenter region of NewYork. This created a huge latency when accessing my website page or even accessing the server via SSH.

The optimal region here would be to select a region from where your website generates most of the traffic. Also look at this website below which does a latency test of all DigitalOcean's servers.
After you have decided which region you want move onto the next step.
VPC Network
Since we are using a single droplet we don't need a VPC network. Either leave it as blank or select the default network.

Choose your authentication method
I recommend SSH keys but for testing purpose you can always go with Password based authentication.

Finalize and create
All other options are pretty self explanatory.

Tap on Create droplet.
Your droplet will be created in a few minutes. SSH into your droplet
ssh root@use_your_droplet_ipOnce logged in, we'll see the installation do its work automatically.
Adding a domain
Now there are two options here - Either use DigitalOcean's own DNS manager or use Cloudflare. I have always used Clouflare since it has tons of extra features on which I will be making a different set of posts.
To add a domain, we need to add an A record in our domain's DNS. This A record will point towards our new IP for our new droplet.

Use your domain name and the Droplet's IP to create an A record. We are pointing it towards our new droplet.
Make sure that when you visit your url, it redirects you to your new Ghost installation. Once that DNS record is working, we can go back to our terminal to continue installation.
Enter some required details asked by the installer and we are done here. The new ghost blog should be accessible via your domain name.
Learn something new everyday.
]]>Since I use Cloudflare to proxy all my website traffic, I found this neat piece of Javascript code which can do the lazyloading on the fly.
class ElementHandler {
  element(element) {
      if(!element.getAttribute('loading')){
        element.setAttribute('loading', 'lazy');
      }
  }
}
async function handleRequest(req) {
  const res = await fetch(req);
  return new HTMLRewriter().on('img', new ElementHandler()).transform(res)
}
addEventListener('fetch', event => {
  event.respondWith(handleRequest(event.request))
})
So how this works?
Adding loading=lazy to all img elements that don't already contain a loading attribute. This uses the new native lazy-loading feature within Chrome to lazy-load images, which can help a lot of page-weight, especially on mobile devices. Other browsers are likely to implement this new specification soon.
All you have to do is create a worker in CloudFlare and add the above snippet in it.
A cool upgrade to this feature would be to blur the images when they are loading so you don't see a blank box.
]]>I have a home server setup that is behind double NATs so I can't (and honestly don't want to) access my home server from the outside of my network. For the past couple of years I have been using HTTP only to access my server. Today]]>
I have a home server setup that is behind double NATs so I can't (and honestly don't want to) access my home server from the outside of my network. For the past couple of years I have been using HTTP only to access my server. Today I thought that it's enough! I want to see that sweet green lock of HTTPS on my server links. So I decided to pick this mini project up. It was quite frustrating at first because every article I read expected that user had a static IP and a domain. Now, in my case this was not possible since I only wanted SSL inside my home network. So I collected a bunch of info from different sources and put together in the easiest possible way below.
The idea here is to become your own Certificate Authority (CA) and issue the certificates for your local domains or internal IP addresses. (Note: I use local domains only. Ex: deluge.homeserver, vscode.homserver etc. These domains are resolved through a local DHCP RaspberryPi server)
Let's dive in.
Root SSL certificate
The first step is to create a Root SSL certificate. This root certificate can then be used to sign any number of certificates that you will generate for local domains.
Generate an RSA-2048 key and save it to a file called rootCA.key. This file will be used as the key to generate the Root SSL certificate. You will be prompted for a pass phrase which you’ll need to enter each time you use this key to generate a certificate.
openssl genrsa -des3 -out rootCA.key 2048You can use this generated rootCA.key to create a new Root SSL certificate. Save it to a file named rootCA.pem. This certificate will have a validity of 3650 days (10 years).
openssl req -x509 -new -nodes -key rootCA.key -sha256 -days 3650 -out rootCA.pemTrust the root SSL certificate
Before you can use the newly created Root SSL certificate to start issuing domain certificates, there’s one more step. You need to to tell your Mac/PC to trust your root certificate so all the individual certificates issued by it are also trusted.
Open Keychain Access on your Mac and go to the Certificates category in your System keychain. Once there, import the rootCA.pem using File > Import Items. Double click the imported certificate and change the “When using this certificate:” dropdown to Always Trust in the Trust section.
Issue individual domain SSL certificate
The root SSL certificate can now be used to issue a certificate specifically for your local server.
Create a new OpenSSL configuration file server.csr.cnf so you can import these settings when creating a certificate instead of entering them each time.
[req]
prompt = no
default_bits = 2048
default_md = sha256
distinguished_name = dist

[dist]
C=US
ST=XYZState
L=XYZCity
O=XYZOrganization
OU=XYZOrganizationUnit
[email protected]
CN = localhost [or insert ip address of your server]
Create a v3.ext file in order to create a X509 v3 certificate.
authorityKeyIdentifier=keyid,issuer
basicConstraints=CA:FALSE
keyUsage = digitalSignature, nonRepudiation, keyEncipherment, dataEncipherment
subjectAltName = @alt_names


[alt_names]
DNS.1 = code.homeserver
OR
IP.1= 10.0.0.11 [IP.1 IP.2 for ip addresses or DNS.1 for DNS names]
Create a certificate key for local server using the configuration stored in server.csr.cnf. This key is stored in server.key.
openssl req -new -sha256 -nodes -out server.csr -newkey rsa:2048 -keyout server.key -config <( cat server.csr.cnf )In case you are using Fish shell:
openssl req -new -sha256 -nodes -out server.csr -newkey rsa:2048 -keyout server.key -config ( cat server.csr.cnf | psub)A certificate signing request is issued via the root SSL certificate we created earlier to create a domain certificate. The output is a certificate file called server.crt.
openssl x509 -req -in server.csr -CA rootCA.pem -CAkey rootCA.key -CAcreateserial -out server.crt -days 500 -sha256 -extfile v3.extUse your new SSL certificate
You’re now ready to secure your local server with HTTPS. Move the server.key and server.crt files to your Nginx or Apache directory and include them in the .conf files.
Bonus
How to get green padlock in Firefox -
Even if the rootCA.pem was trusted in my Mac I was getting security warnings in Firefox. So I had to trust the rootCA.pem in Firefox manually -
Import the rootCA.pem in Firefox Preferences > Privacy and Security > View Certificates > Authorities > Import
]]>
This is why people all over the world are shifting more towards open source operating systems and softwares. With]]>
This is why people all over the world are shifting more towards open source operating systems and softwares. With Linux, the possibilities are endless. And I found another such gem the other day.
Quickbox
Quickbox is more than just a script, as they say it. It allows you to install many useful applications with just a click and gives you relevant data in a beautiful format. Now, I like to install everything myself rather than relying on scripts and frankly that's how one learns about the linux environment. But there are times when certain tasks can be done with scripts only. Honestly scripts are both good and bad. They save your time but also are difficult to manage.
So Quickbox, as I was saying, makes your life a little easier. First of all look at the interface -
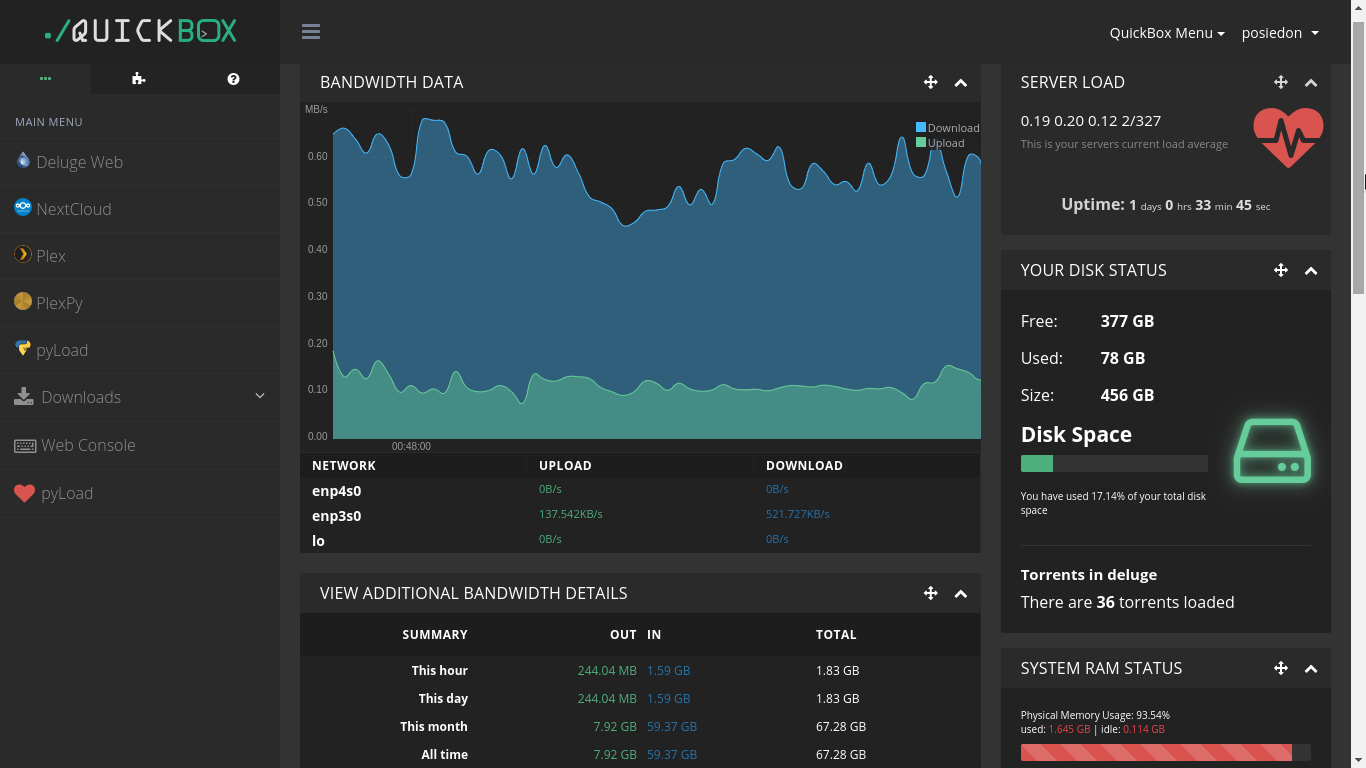
It is so great to look at. But quickbox is more than just a fancy front end. It has more than 20 applications built in like Plex, Plexpy, Deluge, Resilio Sync, Nextcloud and many more. Click install and done. I am using Quickbox for more than 3 days now and I am quite impressed. Although there are a few issues here and there, but the community and the developers are very helpful. One might stumble here and there, at first, then one gets a hang of it.
How to install it?
apt-get -yqq update; apt-get -yqq upgrade; apt-get -yqq install git lsb-release; git clone https://github.com/QuickBox/QB /etc/QuickBoxbash /etc/QuickBox/setup/quickbox-setupThat's all. The script will let you know what to do next. I would recommend you to first visit Quickbox's original website and also study the script yourself before installing.

A classic scenario is connecting from your desktop or laptop from inside your company’s internal network, which is highly secured with firewalls. In order to easily manage a server in a DMZ (demilitarized zone), you may access it via a jump host.
In this scenario, you want to connect to HOST 2, but you have to go through HOST 1, because of firewall, routing and access privileges. There is a number of valid reasons why jump hosts are needed.
Static Jumphost List
Static jumphost list means, that you know the jumphost or jumphosts that you need to connect a machine. Therefore you need to add the following static jumphost ‘routing’ in ~/.ssh/config file and specify the host aliases as shown.
### First jumphost. Directly reachable
Host one
	Hostname example1.com
	IdentityFile ~/ssh.pem
	User bob-mcguire

### Host to jump to via jumphost1.example.org
Host two
	Hostname example2.com
	IdentityFile ~/ssh.pem
User bob-mcguire Now try to connect to a target server via a jump host
$ ssh -J one twoThe above command will first open an ssh connection to server one in the background and there after, start the ssh session to the target server two.
The real problem here was how to remove my old domain from every search crawler out there and move existing traffic to the new domain. I have been using Cloudflare since the beginning of era and it made the solution simple enough.
Redirecting domains is very easy in Cloudflare. Let's say you have two domains
- https://domain1.com (Old domain)
- https://domain2.com (New domain)
And you want to redirect all traffic from domain1 to domain2, including the traffic of subpages. For ex:
domain1.com > domain2.com
domain1.com/page1 > domain2.com/page1
domain1.com/page2 > domain2.com/page2
abc.domain1.com > abc.domain2.com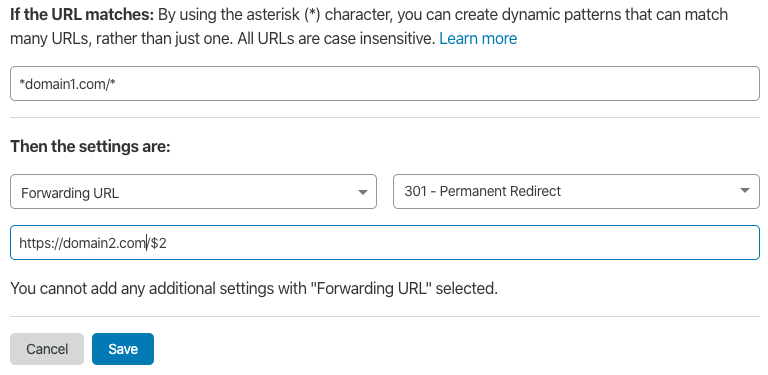
Read more about Page Rules on Cloudflare docs webpage.

]]>
Webfonts
By using a specific CSS @font-face embedding technique it is possible to embed fonts such that they work with IE4+, Firefox 3.5+, Safari 3.1+, Opera 10+ and Chrome 4.0+. This allows the vast majority of Web users to access this functionality.
Fonts come in various formats,
Webfonts
By using a specific CSS @font-face embedding technique it is possible to embed fonts such that they work with IE4+, Firefox 3.5+, Safari 3.1+, Opera 10+ and Chrome 4.0+. This allows the vast majority of Web users to access this functionality.
Fonts come in various formats, with OpenType arguably the most common one for desktop use. For the web, you need web fonts, which come different file formats. FontSquirrel offers a service to generate web fonts from other font formats. They will also generate the css font-face declaration that goes with the web font they generated.
Add Webfonts to the Hexo Theme Source
For the website to render the content in the selected fonts, the web fonts have to be moved to fonts directory. This is accomplished by storing the web font files (.woff2, .woff) in the source/fonts directory.
```bash.├── _config.yml├── package.json├── scaffolds├── source| ├── _drafts| └── _posts└── themes| ├── source| └── fonts```
.
├── _config.yml
├── package.json
├── scaffolds
├── source
|   ├── _drafts
|   └── _posts
├── themes
|   ├── source
|       └── fonts
Stylus Declaration
For Hexo themes, we can declare this codeblock in the font.styl or any stylus file that your theme is using. Although a good practice is to have a separate font.styl file to maintain proper code visibility.
@font-face {
    font-family: 'mulilight';
    src: url('../fonts/muli/muli-light-webfont.woff2') format('woff2'),
         url('../fonts/muli/muli-light-webfont.woff') format('woff');
    font-weight: normal;
    font-style: normal;
}
Font Variable
Now we can create a font variable in Stylus and reference that variable wherever required.
$font-family = 'mulilight'
on_click event is triggered. I specifically integrated this in my website. function go_top() {
window.scrollTo({
top: 0,
behavior: 'smooth'
});
}
function go_bottom() {
window.scrollTo({
top: document.body.scrollHeight,
behavior: 'smooth'
});
}<a onclick="go_top()">Back to top</a>
<a onclick="go_bottom()">Go to bottom</a>Trust is one of the most valuable currencies among humans. Without it you can’t build better relationships with anyone.Trust is a bilateral relationship. Trust is why people get married. Trust is the reason you pay for expensive services knowing that you will get good value for your money.
Here is a simple truth about humans you should keep in mind — we are all wired for connection, we care deeply about ourselves, we want to feel important, and we like and trust familiar things. These ideas are the basic foundation for building rapport with just about anyone.
Robin Dreeke is the Founder of People Formula, Former Head of FBI Behavioral Analysis Program. The FBI process includes research into social and evolutionary psychology, which has been honed from years of field experience.Throughout his life, Robin has received advanced training and experience in the area of social psychology and the practical application of the science behind relationship development.
In his book It’s Not All About “Me”: The Top Ten Techniques for Building Quick Rapport with Anyone, he reveals that establishing artificial time constraints is the best approach to start a conversation with a stranger.When you approach someone to start a conversation most people assess the situation for threat before anything else. Discomfort in any conversation with a stranger happens because there is no end in sight says Dreeke. He explains:
The first step in the process of developing great rapport and having great conversations is letting the other person know that there is an end in sight, and it is really close.
Once you have dealt with the awkwardness of starting a conversation and established clearly that you don’t intend to take all their time, you want to look non-threatening. The best nonverbal technique you can use to look more accommodating is to smile.
If you don’t feel comfortable using this approach to start a conversation, you can test the strength of your rapport by changing your body language and observe whether the other person’s body language follows yours. Matching and mirroring are about being in tune with the other. Dreeke argues:
When you walk into a room with a bunch of strangers, are you naturally drawn to those who look angry and upset or those with smiles and laughing? Smiling is the number one nonverbal technique you should utilize to look more accommodating.
You can also project confidence in a conversation by making eye contact for about 60 to 70 percent of your interaction with someone. Studies show upon meeting someone, we’re looking for evidence of confidence. In It’s Not All About “Me”: The Top Ten Techniques for Building Quick Rapport with Anyone, Dreeke writes:
Whenever I have a conversation that I believe is important for me to be credible in my content, I purposely slow down the delivery and take pauses for people to absorb the content of what I have just said.Just listen. Listening is the simplest way to validate others. You don’t need to tell your story; just encourage them to keep telling theirs. Make them feel important. For most of us, our natural reaction is to interrupt, but it also means that we are never fully present when someone is talking.Hold back from interrupting or overriding with your own points, thoughts and ideas. Dreeke says, suspend your ego.
A great conversationalist encourages others to talk about themselves, neglecting their own need to share their great stories. In our louder and louder world, says sound expert Julian Treasure, “We are losing our listening.” He recommends an approach he calls ‘RASA’ — receive, appreciate, summarise and ask. He says the art of conversation is being replaced — dangerously — by personal broadcasting.
True validation coupled with ego suspension means that you have no story to offer, that you are there simply to hear theirs.
Be curious and ask open-ended questions. If you’re really listening, this should be pretty easy. “Once the individual being targeted in the conversation supplies more words and thought, a great conversationalist will utilize the content given and continue to ask open-ended questions about the same content” argues Dreeke.
People who ask more questions, and specifically follow-up questions, during a conversation, are perceived as more likeable, according to a Harvard University research.You’ll never get a second chance to make a great first impression with people you meet. So with the few minutes to spare to get someone on your side, make the most it. And always remember, the right attitude is everything. Make sure the other person walks away better for having met you.
Original article: Link
A simple CORS policy for AWS S3 bucket to access any file from external sources. I use this policy for my images hosted on https://travel.ishaanx.com
<?xml version="1.0" encoding="UTF-8"?>
<CORSConfiguration
xmlns="http://s3.amazonaws.com/doc/2006-03-01/A simple CORS policy for AWS S3 bucket to access any file from external sources. I use this policy for my images hosted on https://travel.ishaanx.com
<?xml version="1.0" encoding="UTF-8"?>
<CORSConfiguration
    xmlns="http://s3.amazonaws.com/doc/2006-03-01/">
    <CORSRule>
        <AllowedOrigin>*.example.com</AllowedOrigin>
        <AllowedMethod>HEAD</AllowedMethod>
        <AllowedMethod>GET</AllowedMethod>
        <MaxAgeSeconds>3000</MaxAgeSeconds>
        <ExposeHeader>x-amz-server-side-encryption</ExposeHeader>
        <ExposeHeader>x-amz-request-id</ExposeHeader>
        <ExposeHeader>x-amz-id-2</ExposeHeader>
        <ExposeHeader>Access-Control-Allow-Origin</ExposeHeader>
        <ExposeHeader>Access-Control-Allow-Methods</ExposeHeader>
        <AllowedHeader>*</AllowedHeader>
    </CORSRule>
</CORSConfiguration>
Use cases
- To create your own CDN for files such as public images, .CSS, .JS, .JSON.
history | awk '{CMD[$2]++;count++;}END { for (a in CMD)print CMD[a] " " CMD[a]/count*100 "% " a;}' | grep -v "./" | column -c3history | awk '{CMD[$2]++;count++;}END { for (a in CMD)print CMD[a] " " CMD[a]/count*100 "% " a;}' | grep -v "./" | column -c3 -s " " -t | sort -nr | nl | head -n10Here are the results from my new personal machine:
147  31.0127%   hexo
76   16.0338%   ls
55   11.6034%   cd
37   7.80591%   npm
25   5.27426%   hugo
23   4.85232%   git
17   3.5865%    mysql
12   2.53165%   ssh
12   2.53165%   fish
11   2.32068%   brew
For the sake of sample size, I recommend having a large history file size, e.g for bash, put in your ~/.bashrc:
HISTSIZE=10000 #max number of commands to remember per ongoing sessionHISTFILESIZE=20000 #max number of lines contained in the history fileOr you can use negative values to set the size to infinite.
Okay so the other day I came across a problem and a simple solution to that problem. A Christmas miracle so to speak.
Problem
I have a serice called Sonarr which downloads some TV shows every week and moves it to /home/alpha/TVI have another service called Plex which streams these shows to every device I own.Sonarr sets different file permissions for those TV files and Plex can only access those files with certain permissions. If there is anything we should learn in this world is how the linux permissions work.
Up until now I was managing these permissions manually every week, which means manually going into the TV directory and setting up proper permissions on all files. Now this all sounds very good if you have 10 files. But when this number reaches 7000, managing everything manually becomes tedious.
Solution
Now inotify is a linux kernel feature which detects 'changes' in the specified directory. incrontab is another cron like service which uses inotify to detect changes in file system and execute commands. crontab is a "time" based service whereas incrontab is a "change" based serice.
Basically you can achieve automated command execution upon a directory change. incrontab is fairly simple to use.
Install on you distro
For Ubuntu 18 server
sudo apt update -y && apt upgrade -y
sudo apt install inotify-tools incron -y
incron user configuration
incron can only run by users which are defined in /etc/incron.allow, a very clever solution by developers.
All we have to do is put the username in this file who will be allowed to run incrontab.
Check if the service is running
sudo systemctl status incron

incron.service - file system events scheduler
   Loaded: loaded (/lib/systemd/system/incron.service; enabled; vendor preset: enabled)
   Active: active (running) since Wed 2019-12-25 17:47:01 UTC; 57min ago
  Process: 28218 ExecStart=/usr/sbin/incrond (code=exited, status=0/SUCCESS)
 Main PID: 28225 (incrond)
    Tasks: 1 (limit: 1816)
   CGroup: /system.slice/incron.service
           └─28225 /usr/sbin/incrond
(if service is disabled)
sudo systemctl start incron incron define directories and commands
We can create incrons simply by using this command
incrontab -eThe general line format is the following:
<path> <mask> <command>
An Example Cron
/home/alpha/hdd1 IN_MODIFY,IN_MOVED_TO chown -R root:plex /home/alpha/hdd1/tv/*Breakdown
| Syntax | Variable | Description |
|---|---|---|
| path | /home/alpha/hdd1 | The directory being watched for changes |
| mask | IN_MODIFY | Mask that says monitor the directory for any file modifications |
| mask | IN_MOVED_TO | Mask that says monitor if any file is moved into the watched directory |
| command | chown -R root:plex /home/alpha/hdd1/tv/* | Are the commands that will be executed if any of the masks returns true |
If any new file is moved into the TV folder, then incron will run the above command and set permissions on all files. There are some other masks which are defined in the man page of incrond -
 IN_OPEN:          File was opened
 IN_ACCESS:        File was accessed (read)
 IN_ATTRIB:        Metadata changed (permissions, timestamps, extended attributes, etc.)
 IN_CREATE:        File/directory created in watched directory
 IN_DELETE:        File/directory deleted from watched directory
 IN_MODIFY:        File was modified
 IN_MOVED_TO:      File moved into watched directory
 IN_MOVE_SELF:     Watched file/directory was itself moved
 IN_MOVED_FROM:    File moved out of watched directory
 IN_DELETE_SELF:   Watched file/directory was itself deleted
 IN_CLOSE_WRITE:   File opened for writing was closed
 IN_CLOSE_NOWRITE: File not opened for writing was closed
Note: incron does not support recursive monitoring
There are a few options out there for this type of thing:
- crond (limited to every minute)
- incrond (cannot recursively watch a directory)
- inotify (what we’re using along with incrond!)
- PyInotify (python package that does what inotify does).