
Deluge Torrent Server on Ubuntu 16.04
Peer-to-peer file transfer is a great tool for file sharing without the need for having to rely on a dedicated server.Instead you can spread the download among many peers in order to have great redundancy as well as faster transfer speeds.
While this is often used for illegal file sharing, it can also be a legitimate way of sharing files with others. This tutorial will show you how to setup a torrent server on a dedicated Linux server using the popular torrent client Deluge.
Installation
Step 1 – Adding A Dedicated User
We will start by adding a dedicated user account that the torrent client will run through. To do this we open the terminal and type the following command.
sudo adduser --disabled-password --system --home /var/lib/deluge --gecos “deluge” --group delugeThe above command adds a user with no password, a home directory located in /var/lib and adds it to a user group also called deluge. Having no password means the user account cannot be logged into if someone gains access to your server.
Step 2 – Installing Deluge
We are now going to install the Deluge Client onto our server along with the WebUI. By installing the WebUI, we will be able to control our torrent server with a web browser or a deluge client.
Add the deluge repository using the following command:
sudo add-apt-repository ppa:deluge-team/ppaThe Deluge client can be installed by running the following command in the terminal:
sudo apt-get update && sudo apt-get install deluged deluge-webui -yStep 3 – Make Deluge Start On System Boot
The Deluge Daemon is the part of the Deluge Client that allows it to run as a background service. A lot of torrent clients have this as it allows us to close the programs but still keep our file sharing running in the background.
We need to enable two daemons, one for the client itself and the other for the WebUI. To enable the first daemon, we need to write an init script that will make it start on boot as well as giving us the ability to start/stop it on demand.
Deluge Daemon (deluged) Service
Create the file deluged.service using the following command:
sudo nano /etc/systemd/system/deluged.servicePaste the following lines in the file:
[Unit]
Description=Deluge Bittorrent Client Daemon
Documentation=man:deluged
After=network-online.target
[Service]
Type=simple
User=deluge
Group=deluge
UMask=007
ExecStart=/usr/bin/deluged -d
Restart=on-failure
#Time to wait before forcefully stopped.
TimeoutStopSec=300
[Install]
WantedBy=multi-user.target
Now enable it to start up on boot, start the service and verify it is running:
sudo systemctl enable deluged
sudo systemctl start deluged
sudo systemctl status deluged
Deluge Web UI (deluge-web) Service
Create the file `deluge-web.service` using the following command:
sudo nano /etc/systemd/system/deluge-web.servicePaste the following lines in the file:
[Unit]
Description=Deluge Bittorrent Client Web Interface
Documentation=man:deluge-web
After=network-online.target deluged.service
Wants=deluged.service
[Service]
Type=simple
User=deluge
Group=deluge
UMask=027
ExecStart=/usr/bin/deluge-web
Restart=on-failure
[Install]
WantedBy=multi-user.target
Now enable it to start up on boot, start the service and verify it is running:
sudo systemctl enable deluge-web
sudo systemctl start deluge-web
sudo systemctl status deluge-web
Step 4 - Logging (Optional)
Create a log directory for Deluge and give the service user (e.g. deluge), full access:
sudo mkdir -p /var/log/deluge
sudo chown -R deluge:deluge /var/log/deluge
sudo chmod -R 750 /var/log/deluge
The deluge log directory is now configured so that user deluge has full access, group deluge read only and everyone else denied access. The umask specified in the services sets the permission of new log files.
Enable logging in the service files by editing the ExecStart line, appending -l and -L options:
ExecStart=/usr/bin/deluged -d -l /var/log/deluge/daemon.log -L warning
ExecStart=/usr/bin/deluge-web -l /var/log/deluge/web.log -L warning
Restart the services
sudo systemctl restart deluged
sudo systemctl restart deluge-web
Log Rotation
To enable log rotation create `/etc/logrotate.d/deluge` with the following code:
/var/log/deluge/*.log {
        rotate 4
        weekly
        missingok
        notifempty
        compress
        delaycompress
        sharedscripts
        postrotate
                systemctl restart deluged >/dev/null 2>&1 || true
                systemctl restart deluge-web >/dev/null 2>&1 || true
        endscript
}
Step 5 - Open Ports
Deluge WebUI runs on the port 8112. Open the port using the following command:
sudo iptables -I INPUT -p tcp --dport 8112 -j ACCEPT
Step 6 - Configure Deluge
Fire up your favorite browser and go to the following link: http://ip-address:8112
The default password is deluge.
At this point deluge is fully working and you can download files through torrent.
But what we want is different. We want to control deluge without opening the browser at all. We would want to control it through local Deluge client on Windows. In this way, whichever torrent I add in Windows's Deluge will be downloaded in your server directly.
Open up Deluge in your browser and go to Preference > Daemon > Check Allow Remote Connections
Apply and close.
SSH into your server and follow the steps
sudo killall deluged deluge-webOpen the `web.conf` file
sudo nano /var/lib/deluge/.config/deluge/web.confEdit the line saying "default_daemon":"", to "default_daemon":"127.0.0.1:58846",
This will auto-connect the daemon to Deluge WebUi.
Create a username and password for Deluge
sudo nano /var/lib/deluge/.config/deluge/authIn a new line, create a user. For example albus:password:10
Here, I created a user named albus with a password and the 10 represents admin privileges. Save the file and exit.
Step 7 - Sync with Windows
We will install Deluge on Windows 10 (it is the same procedure for all the supported Windows versions). Download Deluge for Windows from Deluge’s official site, select the latest version (at the moment of writing this guide it is version 1.3.15) and install it.
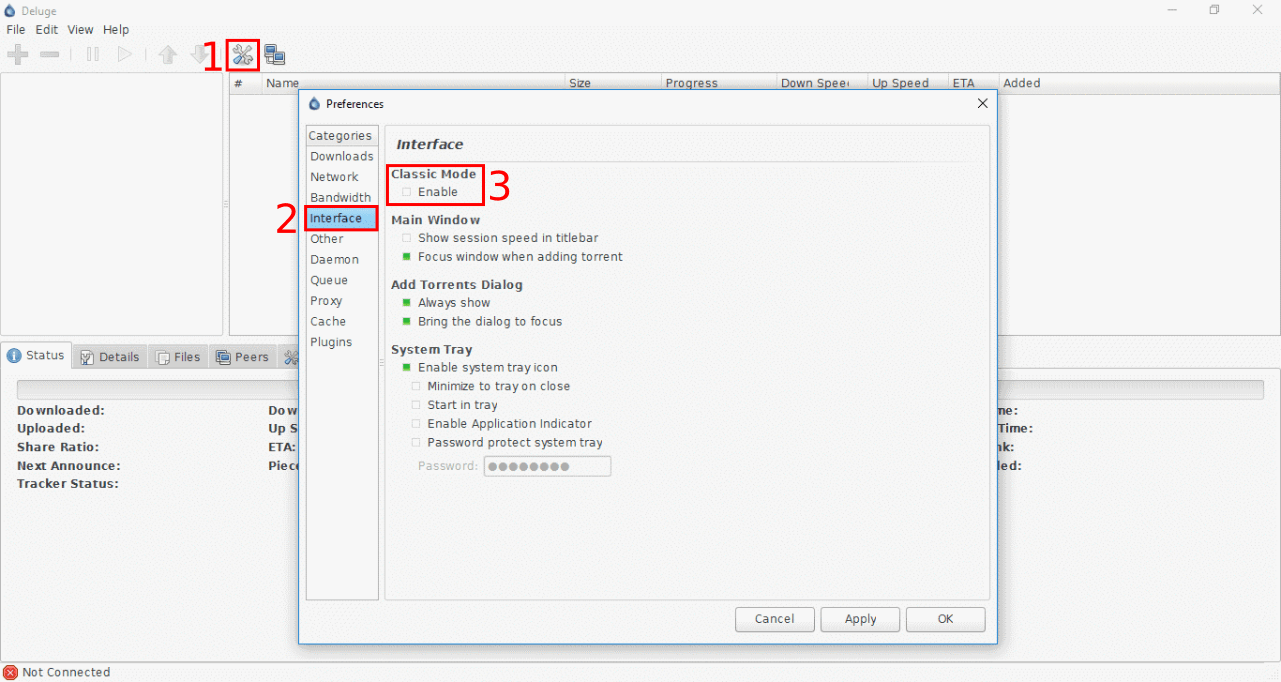
Click on Preferences (1), then Interface (2), and deselect Enable under Classic Mode (3), as in the screenshot. Click OK. Deluge will prompt you that you need to restart, click yes, and start Deluge again.
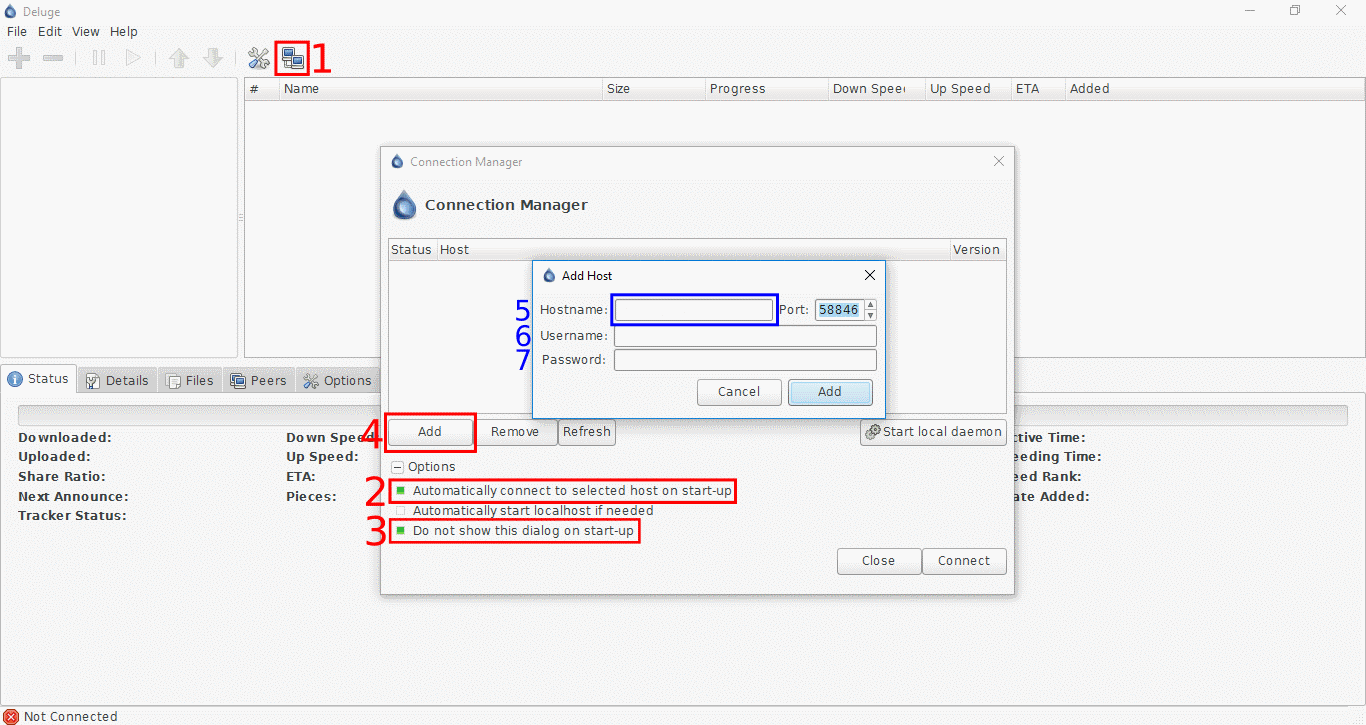
When Deluge starts, you should see the Connection Manager windows. If not, click on the icon (1). Make sure Automatically connect to selected host on start-up (2) and Do not show this dialog on start-up (3) are selected. This will make Deluge automatically connect to the configured Deluge daemon on each start and not prompt you to select which daemon to control each time you start Deluge on your client.
To add the host click Add (4) and under Hostname (5) enter the IP address of your server. Next, leave the Port as is, and enter the Username (6) and the Password (7) we created in Step 5 in the auth file. Click Add, and Connect.
Voilà! Everything is now configured. Now, if you add torrents in Deluge in Windows it will be downloaded in your server and not in Windows. The Deluge on Windows is just a 'Remote controller' for your server's Deluge.